Monday, January 5, 2009

Technical Dificulties

I found out tonight that there is a problem with some of the images on this blog.

Every once in a while as I am writing a post I like to give examples of what I mean in the form of an image rollover effect. It just means that I ask you to put your mouse over an image and it changes into a different one to illustrate a point. Well, it has come to my attention that the method I am using for this does not always work in Internet Explorer.

I haven't figured out why yet but I am working on it. I will either find a solution soon or find another method to get this done. In the mean time the work around is to just load the page again and see if it works.

Sorry for any confusion.

*Update: I have tested with a few browsers already and all but Internet Explorer seem to be unaffected on both Mac and Windows. If you are using a browser besides Internet Explorer and run into this problem please let me know.

*It might be premature but I may have just found my problem. In the process I discovered another slight problem, but I know the solution to that one.

White Balance Cards

For those of you that are well versed in White balance, did you know that there is a difference between a white balance card and an 18% grey card?

Well I consider myself fairly well versed in white balance, but Michael Tapes over at rawworkflow.com taught me a a thing or two about how to no kidding properly measure white balance.

Take a look at these videos and you can tell how much this guy cares about his products.

Tweaking Your Photos

Every once in a while some one decides to make me feel special and ask me about my photography workflow. Inevitably this leads to a conversation about what photo software I use for my pictures.

Without getting into what software I use for the moment I wanted to take this chance to talk about what post processing is and my own opinion on you can and can't do before you can no longer call some thing a "photograph" and have to start calling it art more in the sense of a painting or collage.

There are purists out there for whom no amount of digital post processing is acceptable. Let me tell you first of all that I am not one of those purists. People seem to think that if you present anything but exactly what came out of the camera as a photograph that you are being dishonest in some way. This has never been the truth. Even in the days of film and dark room, the choice of papers and chemicals, the method you chose for development, and any number of other decisions that I don't know about, had a huge effect on the end result of the print.

Today any single digital capture can result in many many different variations. Changing the color balance, the contrast, or anything like that can all be done after the capture to create the image the photographer wants. The purist scoffs and say's that in the old days it had to be done right the first time. He idealizes the past without knowing the truth.

The truth is that photographers in the dark room had many tools at their disposal to get the images the wanted. They had dodging and burning, filters, different papers, all kinds of things like that. In some cases photographers would take an exposure for the sky, and then another for the real subject, and then insert the sky from the first exposure into the second in a process called "combination printing". Does that sound familiar to anyone? This is the same thing by more controllable means.

What's the difference between then and now? Really it's just the ease with which we can accomplish our adjustments. Sure I can change the color balance, add sepia tones to black and whites and all sorts of things like that, but really you have to respect the amount of work that it took to do it in a dark room don't you?

So in this day and age when an innocent portrait can be so easily manipulated into a scandalous embarrassment, where is a person to draw the line?

Well if you ask me (and thanks for asking) I think it all comes down to the comfort level of the photographer and how original he is representing his work to be. I have no problem adjusting white balance, tweaking exposure a bit, even getting rid of dust spots, and I feel no need to give a disclaimer that a photograph is manipulated. If you are shooting RAW like I do (I know I know, its not necessary, but I do) you have even less reason to warn anyone about it as I'll talk about some time.

What I won't do is add or remove anything that changes the content of the photograph, or makes it look like I am significantly more skilled than I really am. I don't like to remove bystanders, swap out a dreary or over exposed sky for a better one, or do anything else that would make the scene that I saw unrecognizable in the final photograph.

Thats not to say that I don't do some light digital art, I do, but I don't try to pass it off as photography in the normal sense.

So why am I saying this? What does it mean for you? It means that you should feel confident taking your pictures and then adjusting them to taste as you please. Don't let any one tell you that you are some how less of a photographer because you like to adjust them how you like them. I certainly prefer to get them as close to my final goal in camera as I can, but thats because I take hundreds of images at a time and adjusting them all would be a pain no matter how good my software was.

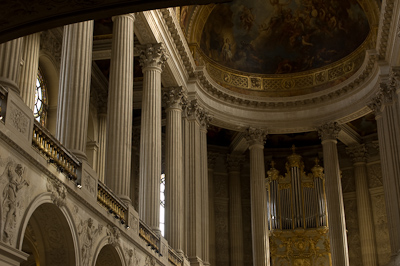
I just wanted to point out one last thing before I wrap this up. There is another reason to get photo's as close to right the first time as possible. Take a look at this image below.

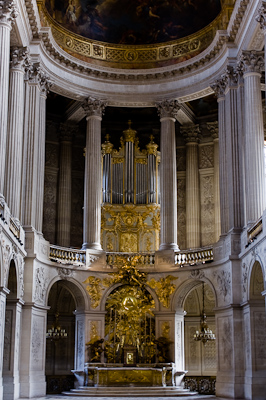
This is a picture of the cathedral inside the Chateau De Versailles in Paris. As you can see it isn't very good. You can roll your mouse over and see what I did to try and fix it. The results are underwhelming, and for one important reason. Lightroom doesn't have a crappy composition tool. I can crop out whatever that is the upper left, but that won't fix all the incomplete columns or the slightly disorienting tilt it has going on. I show you this picture as an illustration of the fact that no amount of software can replace the skill of the photographer in taking the right picture. Sure you can fix color in some cases, and you can fix exposure some times, but the software doesn't decide when to press the shutter button.

At the bottom of this post you will find the version I chose to post online. Sure I tweaked the color balance, and the camera didn't actually see the scene that brightly, but I took that photograph and I don't hesitate to call it original.

DSC_4018.jpg

Friday, January 2, 2009

Bad News

So I have a small bit of bad news. I don't actually have my camera anymore. There are camera's in the house, but mine is gone right now. It has a problem that really just became too much and I had to send it in for repair.

My main camera that I sent in is a Nikon D50, and this is a good time to talk real quick about the problem it's having.

The problem is with a feature that many digital camera's use now called "Long Exposure Noise Reduction". We can get into a more detailed discussion of noise soon here but for this post let's just talk about what long exposure noise reduction does for us, and what my camera's malfunction was doing to my photo's

Whenever you take photo's with a digital camera, inevitably you get some thing called noise. Don't go feeling too superior if you shoot film because film shooters get some thing similar called grain. Digital noise is a result of the fact that your camera's is trying to convert some thing that is not digital (light hitting the sensor) into some thing that is digital (the signals it sends to the image chips inside the camera).

The problem is that digital signals are very clean and certain, either a 1 exists or a 0 exists. When a digital device receives a 1 or a 0, it is certain of what it has received. But the real world is not that certain. The light hitting your cameras sensor isn't just there or not there, it has infinite variations of color or intensity. Your camera's sensor has to find a way to describe those infinite variations using a limited set of numbers, and it isn't always certain which one to choose. It gets worse though, the same intensity of light will not always result the sensor choosing the same numbers. Some times a certain level of light hitting the sensor will cause it to send a signal and some times it won't.

Don't worry though, it gets worse still! Your sensor is composed of millions of tiny little sensors like the compound eye of a fly. When you put a bunch of the together on a sensor and shine the same color and intensity of light at all of them, they will not all agree on what it is that they are seeing.

The result is that if you were to take a picture of just a blue sheet of paper, or any thing else that is the same color and brightness, the picture you will get from the camera will not look uniform and smooth. Some pixels will be slightly red, some of them slightly bluer, some of them will be brighter and some of them will be dimmer than they should be. We call these variations noise.

Ready for an example? Take a look at this picture to the right. I have it zoomed in to 100% so we can see the noise better so I'll tell you that we are looking up at a building at night. At the top you see the roofline and the night sky and looking lower you see a window with the doors open and flowers coming out of it.

The first thing we want to look at that will show us the noise most dramatically is the night sky at the top of the image. See all those red spots? Of course those weren't actually there, but the sensor said it saw them because it wasn't really sure what it was seeing. The fact is of course that it wasn't seeing anything, but it told the image chips that it saw red spots.

Now look at the building. Here you can see all kinds of red spots and blue spots along with tiny spots that are brighter or darker than they should be.

All of these spots of red and blue and dark and light are the result of noise and an image that has a lot of it called "noisy". An image that is smooth without much noise called a "clean" image.

Noise to one degree or another is just an unavoidable fact of life in digital photography, but your camera does the best it can to deal with it. One of the strategy's it uses is called "Long Exposure Noise Reduction.

One of the peculiarity's of digital image noise is that the longer it takes to capture the image, the worse the noise is going to be. Well camera designers are smart people and they came up with an ingenious way reduce the appearance of long exposure noise. They program your camera to take the actual picture, and then to take another picture of just black (it takes a picture with the shutter closed) for the exact same amount of time as the first image. Then it uses special algorithms to combine the two images to try and reduce the image in the first one.

Sounds complicated huh? Well don't worry too much about the details just keep one thing in mind. If you take a picture that takes a long time, like a picture of fireworks, and you notice that your picture takes a long time to be ready for you to look at, this is why. Your camera really just had to take two pictures, so the one image takes twice as long to be ready for you to look at. Don't get frustrated though, its worth it.

So back to the subject at hand, why did I have to send my camera in for repair? Well let me show you. Here you see a picture that I too a while back in Iraq. We see here the tail end of a helicopter, but also we see two large black spots.

Where did those come from? It has to do with the long exposure noise reduction feature on my camera. This picture required a 30 second exposure to capture. When the thirty seconds were over my camera closed the shutter and immediately took another 30 second blank exposure. It did this to measure the noise and hopefully remove exactly that much noise from this image.

As you can see however some thing didn't work. Remember I said that a camera sensor is composed of millions of little tiny little individual sensors. Well from the looks of this picture, some of them in my camera aren't working right. When the camera takes the blank image those bad area's of my sensor tell the camera that they still see some thing. As the blank exposure drags on longer and longer their influence of the final image gets stronger and these black spots get larger and darker.

This has been a problem with my camera for a long time, and up till this point I would either just remove these spots in Photoshop, or turn long exposure noise reduction off. Neither of these solutions however is the best.

So now, yes I am sad that I don't have my camera here any more. I am hoping though that my sensor is still fixable, and when I get it back it will work like it should. If my sensor is too bad though, and the camera cannot be salvaged.. well I don't know what then, I guess I'm in trouble.

Tuesday, December 30, 2008

Projects

So raise your hand if you have a thousand personal projects you want to get done and not enough time to do them.

hmmm. That many of you huh?

Well I have a few projects of my own I am working on. I am working on building a web site to showcase my work for one. Of course you can see a lot of the pictures I have taken over the years over at my usual Fotki Photo Albums.DSC_0784.jpg But there are some images I have taken over the years that look great, but just don't really fit into an album format like that. One of them is included here as a sampler. When I get the site up and running it will have a few images like these that I have never shown in my other albums. So be sure to drop by.

If you are a regular viewer of my Fotki Albums try not to get too excited though because I really do put most of my stuff up on fotki.

I'm also working on improving Kara's Blog. Not that it looks bad or anything, it just needs some personal touches.

I am always looking for an excuse to come back here and goof off though so by all means use the link to the upper right and send me a question so I can take a break from all of the stuff that I should be doing like home work, and write a blog post here.

See you all around!

Scene Modes

So you look at your camera, and it has a little wheel that lets you choose different modes. Almost all of us have these features, whether we use a point and shoot camera or even some of the entry level DSLR's. The question is, what are these modes really good for? The answer is that with a little study and maybe even a little trial and error, scene modes can help you get the most out of your camera, especially if you have a point and shoot camera. But before we can start to take advantage of our scene modes we need to be able to interpret what they mean. Night Mode seems to be fairly plainly named, and Fireworks Show mode is pretty self explanatory, but why should I use Party/Indoor mode instead of regular automatic mode? Isn't my camera supposed to take good pictures all the time?

My wife has a point and shoot camera that I am going to use as an example quite a lot because, well its nearby. So with that in mind lets look at my wifes scene modes.

Her camera is a Nikon Coolpix 4600, and according to the manual it has the following scene modes.

  • Party/Indoor
  • Beach/Snow
  • Sunset
  • Dusk/Dawn
  • Night Landscape
  • Close Up
  • Museum
  • Fireworks Show
  • Copy
  • Back Light
  • Underwater
  • Panorama Assist

Lets take a look at the description for Party/Indoor mode and see what we can figure out from the description.

The manual describes it like this with the included image:

Use for shots that include details of the background, or to capture the effects of candlelight and other indoor background lighting.

What can we tell from this picture and description? Well it looks to me like the camera is going to leave the shutter open longer after the flash fires to try and gather background light. I would also guess that its going to turn up the ISO even though you are using the flash to try and gather the light faster. If you weren't using this mode, the camera would take a picture of the woman, and then stop. There would simply be a black background. Roll your mouse over the image to see what that picture might look like if it had been taken in normal automatic mode.

Lets take a look now at the Night Landscape and Fireworks Show modes. These two modes look like they could be pretty similar. Lets look at the descriptions for them.

First Night Landscape mode:

A slow shutter speed is used to produce stunning night land-scapes. Focus is fixed at infinity.
The manual recommends that you use a tripod with this mode, and pay special attention to that part about focus being fixed at infinity, its important.

Now the description for Fireworks Show mode:

Slow shutter speeds are used to capture the expanding burst of light from a firework. The camera responds more rapidly to the shutter-release button, ensuring that you can capture the start of the burst.
  • Focus is fixed at infinity.
  • Follow the firework as it ascends and press the shutter-release button all the way down at the start of the burst.

These two modes look like they could be similar. So lets compare a couple images and see what the differences are.

First up we have the Night Landscape mode image. This was taken off of my apartments balcony at night. In normal automatic mode the flash would have fired and lit up the wires that you can barely see in the image. Once the wires were exposed the camera would have stopped you would have seen nothing of the background, which in this case was the whole point of the shot. Using a night mode like this was the only way to get this shot with this camera.
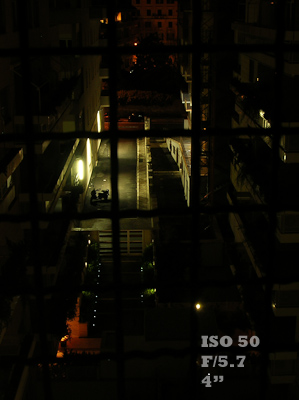
Remember too that in the night modes the focus is fixed at infinity. If it weren't it's most likely that the camera would not have been able to find anything to focus on at all since night scenes are too dark for the camera to focus in. Lets move on now to the Fireworks Show mode.

FireWorks.pngThe image at right was taken with the Fireworks Show mode. The difference is subtle at this size but take a look at the aperture and exposure time. The 5.7 aperture is going to give you a sharper picture which will look better showing the fine lines of fireworks. The ISO was also left lower because fireworks are probably going to be bright against a night sky background.Notice that overall the picture is darker than the first one. Night Landscape mode is trying to pick up buildings and things like that, while Fireworks Show mode is assuming a night sky background that will look much better nice and dark.

So what should we take away from these examples? Well for all of you point and shoot users out there, the point of this post is drive home the importance of using your scene modes with your camera.

Point and shot cameras usually do not allow the fine level of control that DSLR camera's allow, and these scene modes are an important way to take back control over your pictures. Your camera is not a mind reader, it relies on you to tell it what to do. Using scene modes you can tell your camera what you expect it to do. Otherwise it has no idea that you want it to gather background light, or that you want it to focus at infinity despite the fact that it can't find anything to focus on because it's too dark outside.

Armed with this new knowledge, I encourage you to break out your manual and read about the modes that your camera offers, and then go out and experiment!

Sunday, December 28, 2008

Back in a Jiffy!

Back-In-A-Jiffy.pngWell, maybe not in a jiffy, but soon here.

There have been a lot of things going on lately, but my poor blog has not been forgotten. The long awaited post on scene modes is coming up, along with a planned post on why getting a tripod can be one of the absolute best investments you can make to improve your photography.

Until then have a look at this web site that goes over some of the basics of scene modes, just to get you in the mood.