Just in case any one is interested, a few months ago Jeffrey Friedl posted a really great animation of a DSLR shutter on his blog. If you don't have a DSLR don't worry. The concept is pretty much the same, just forget about the mirror in front.
Sunday, November 30, 2008
Monday, November 24, 2008
Shutter Speed
Today we are going to look at the last of the basics that I want to cover before we move on to other things.
We learned already how ISO is a measure of the sensors sensitivity, affecting how much light is needed to make a picture, and Aperture affects how much light can get to the sensor in a certain amount of time.
The shutter speed is what determines how much time the camera has to gather the light to make a photograph. In daytime photography the shutter speed is usually measured in fractions of a second. When the light gets dimmer like during the evening or night time, shutter speed could easily become more than one second in order gather enough light.
As an example, to take to take the picture of the building below during day light took only 1/1000 of a second

But if you are taking pictures in lower light you probably won't be able to get shutter speeds that fast. This next picture was taken at eight o'clock at night. It took 481 seconds, or an eight minute exposer to gather enough light to make a photograph.

These of course are some extreme examples, but some thing that you might want to keep in mind is that your shutter speed has a big effect on how sharp your pictures are. This is because one of the most common causes of blurry photo's is camera motion. The reason is the camera is actually moving while the shutter is open because its impossible to hold a camera perfectly still while taking a picture. If the shutter speed is fast enough then the camera's slight movement isn't enough to make the photo blurry. If the shutter speed drops low enough, then you will get a blurry photograph, even if the subject is motionless and the focus is perfect.

To illustrate I have two photo's of the same painting taken at two different shutter speeds.The first image as you can see was taken at 1/6'th of a second. It came out blurry so I bumped it up just a bit to 1/8'th. Roll your mouse over the image to see the results.
So thats shutter speed. I don't update as often as I should, but soon I will try and tie all of this together and then we'll see what we can do with this knowledge, even if we have an automatic camera.
Monday, November 17, 2008
Aperture
Here we are again, and we've got some thing fun to talk about. We're talking about aperture today. I promise that by the time you are done reading this post you are going to know exactly what an aperture is, and not just because you are going to see a picture of one. We are only going to cover the affect that aperture has on how long it takes to take a photograph today. There are lots of other things you can do with different aperture settings thought that will make for many more posts.
At its most basic level, an aperture is the hole in your lens that light has to pass through on its way to the sensor. A larger aperture in your lens will allow more light to get through the lens and onto the sensor, while a smaller aperture will allow less light to get through. You might be asking why some one would want less light to get through? Well there is a reason but we'll get to that in a second here.
When we talked about ISO we saw that increases in sensitivity were higher numbers. Well with Aperture its the reverse. If you want to increase the size of the aperture in your lens, you have to use a setting with a lower number, and if you want to use a setting with a smaller aperture you have to select a higher number.
As an example lets look at one of the lenses that I use a lot, my 50mm f1.8 lens. The number after the f is the aperture and most lenses will usually have the largest aperture they are capable of printed on the side.
My 50mm (and we'll talk about focal length some time too) has an available range of aperture settings from f1.8 to f22. F1.8 is the largest aperture it is capable of while f22 is the smallest. Lets take a look at an example so we can put this in perspective.
Here you can see a picture of my 50mm lens with the aperture set to f22. The hole in the
Now that we've established exactly what aperture is we can talk about one of its affects on how you take pictures. For today we are going to focus on the apertures affect on shutter speed and why we might want less light to get through the lens at a time.
If we are taking pictures of things that are moving fast and we want the shutter to go fast enough to capture it we could use a high ISO setting like we did with the chess board. But we also saw that doing that can decrease the quality of our images. Instead we can use a wider aperture and the shutter speed will increase without the graininess of a high ISO. The other thing to consider is, what if we are using a low ISO, but there is still too much light for what we are trying to do. Some times we want a slow shutter speed. There is equipment you can buy to accomplish this, but you could just use a smaller aperture. To illustrate what I am talking about I have a couple examples.
You see here a picture of a helicopter that I took some months ago. It looks ok. Its all in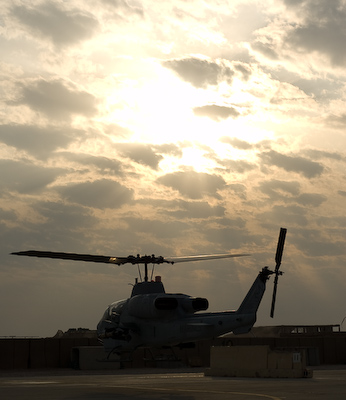

So I hope this has been a pretty good explanation of what aperture is. As always if you have any questions drop me a line, and I'll be back soon to finish off the basics with shutter speed.
Thursday, November 6, 2008
A Small Delay

When I get back look forward to a post on Aperture, and a post on Shutter Speed. Then I'll do two more to finish it off. One will be to tie it all together and talk about how all three work together to create an image. The final one will put this new knowledge to practical use. We are going to get inside a camera's head and interpret the camera's scene modes. What is your camera doing different in the night scene mode that makes good night scene pictures? We will look at the manual and interpret what we read to help us take better pictures.
So stick with it and you'll be taking better pictures in no time!
Sunday, November 2, 2008
ISO Speed
ISO, along with the other two things we will be covering soon, is one of the fundamental things that needs to be understood in order to really understand how your camera works. Since these three things are so tightly interrelated, some of the things we will talk about won't make as much sense now as they will when we are done covering all three and we get to the recap at the end. So bearing that in mind let's dive in.
When we are talking about a digital camera's ISO, most basically, we are talking about how sensitive your camera's sensor is to light. Since most of you reading this are using digital camera's we are going to concentrate on those right now and we'll leave discussions of film for some other time. The basic question we are answering though is, how much light is it going to take until the sensor records it.
When you look at a camera's specifications it will often tell you the range of ISO's it is capable of. For example, if you happen to own a Cannon SD880 IS, your camera has an available ISO range of: Auto, 80 ,100, 200, 400, 800, and 1600. That Auto setting at the beginning there is why most people don't bother setting this themselves. But even if you can't set this directly with your camera there are still indirect ways to select your ISO, as we will learn in another post that will give better results than Auto.
When you are reading ISO numbers, the lower numbers are less sensitive and the higher numbers are more sensitive. With a low ISO number it takes a longer amount of time for the camera to record the same amount of light. With a higher ISO number, it takes progressively shorter amounts of time to record any amount of light.
So far, this is a little dry so lets take a look at an example to illustrate what I mean.
Take a look at this image I made of a chessboard in our apartment. You can see in the lower 
This is an incredibly useful tool that you can use to reduce blurring in your pictures because it allows you to use much faster shutter speeds when taking pictures. This is why ISO is commonly referred to as ISO Speed, because it directly affects the speed with which you can take pictures.
Watch out though, there is a drawback, and its a big one. Not only is the speed with which you can take pictures directly affected by the ISO setting you use, but so is the final quality of your pictures. The bad part is that in this case the benefit goes the other way. The higher the ISO speed you use, the worse and worse your pictures will look. And if you are using a compact digital camera, instead of a big expensive SLR, (a difference we will get into later if I can remember to come back to it) image quality goes down A LOT and VERY FAST
The images you saw above of the chessboards are the entire thing, and at internet sizes they look ok, but lets look at those same images at the kind of size you might see if you decided to print them. The image you see now is a full size section of the photograph taken at ISO 200,
As you can see, different ISO settings have differenct trade offs. Higher ISO setting allow you to take faster pictures with less blur, but lower settings increase your image quality. Which setting to use is an important decision if your camera allows you to make it. My wife's camera, for example, doesn't have a manual ISO setting at all. Many of you out there might have cameras like that. But don't worry, knowing how ISO works and the other topics we will cover soon will still help you have a much happier relationship with your digital camera.
So keep checking back for the next couple posts and this will all start to come together.
Subscribe to:
Posts (Atom)