Tuesday, December 30, 2008

Projects

So raise your hand if you have a thousand personal projects you want to get done and not enough time to do them.

hmmm. That many of you huh?

Well I have a few projects of my own I am working on. I am working on building a web site to showcase my work for one. Of course you can see a lot of the pictures I have taken over the years over at my usual Fotki Photo Albums.DSC_0784.jpg But there are some images I have taken over the years that look great, but just don't really fit into an album format like that. One of them is included here as a sampler. When I get the site up and running it will have a few images like these that I have never shown in my other albums. So be sure to drop by.

If you are a regular viewer of my Fotki Albums try not to get too excited though because I really do put most of my stuff up on fotki.

I'm also working on improving Kara's Blog. Not that it looks bad or anything, it just needs some personal touches.

I am always looking for an excuse to come back here and goof off though so by all means use the link to the upper right and send me a question so I can take a break from all of the stuff that I should be doing like home work, and write a blog post here.

See you all around!

Scene Modes

So you look at your camera, and it has a little wheel that lets you choose different modes. Almost all of us have these features, whether we use a point and shoot camera or even some of the entry level DSLR's. The question is, what are these modes really good for? The answer is that with a little study and maybe even a little trial and error, scene modes can help you get the most out of your camera, especially if you have a point and shoot camera. But before we can start to take advantage of our scene modes we need to be able to interpret what they mean. Night Mode seems to be fairly plainly named, and Fireworks Show mode is pretty self explanatory, but why should I use Party/Indoor mode instead of regular automatic mode? Isn't my camera supposed to take good pictures all the time?

My wife has a point and shoot camera that I am going to use as an example quite a lot because, well its nearby. So with that in mind lets look at my wifes scene modes.

Her camera is a Nikon Coolpix 4600, and according to the manual it has the following scene modes.

  • Party/Indoor
  • Beach/Snow
  • Sunset
  • Dusk/Dawn
  • Night Landscape
  • Close Up
  • Museum
  • Fireworks Show
  • Copy
  • Back Light
  • Underwater
  • Panorama Assist

Lets take a look at the description for Party/Indoor mode and see what we can figure out from the description.

The manual describes it like this with the included image:

Use for shots that include details of the background, or to capture the effects of candlelight and other indoor background lighting.

What can we tell from this picture and description? Well it looks to me like the camera is going to leave the shutter open longer after the flash fires to try and gather background light. I would also guess that its going to turn up the ISO even though you are using the flash to try and gather the light faster. If you weren't using this mode, the camera would take a picture of the woman, and then stop. There would simply be a black background. Roll your mouse over the image to see what that picture might look like if it had been taken in normal automatic mode.

Lets take a look now at the Night Landscape and Fireworks Show modes. These two modes look like they could be pretty similar. Lets look at the descriptions for them.

First Night Landscape mode:

A slow shutter speed is used to produce stunning night land-scapes. Focus is fixed at infinity.
The manual recommends that you use a tripod with this mode, and pay special attention to that part about focus being fixed at infinity, its important.

Now the description for Fireworks Show mode:

Slow shutter speeds are used to capture the expanding burst of light from a firework. The camera responds more rapidly to the shutter-release button, ensuring that you can capture the start of the burst.
  • Focus is fixed at infinity.
  • Follow the firework as it ascends and press the shutter-release button all the way down at the start of the burst.

These two modes look like they could be similar. So lets compare a couple images and see what the differences are.

First up we have the Night Landscape mode image. This was taken off of my apartments balcony at night. In normal automatic mode the flash would have fired and lit up the wires that you can barely see in the image. Once the wires were exposed the camera would have stopped you would have seen nothing of the background, which in this case was the whole point of the shot. Using a night mode like this was the only way to get this shot with this camera.

Remember too that in the night modes the focus is fixed at infinity. If it weren't it's most likely that the camera would not have been able to find anything to focus on at all since night scenes are too dark for the camera to focus in. Lets move on now to the Fireworks Show mode.

FireWorks.png
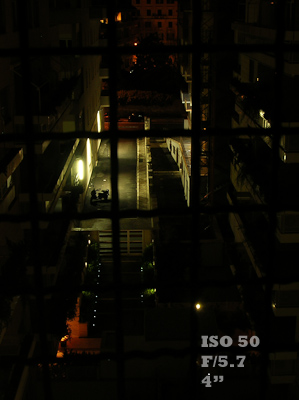
The image at right was taken with the Fireworks Show mode. The difference is subtle at this size but take a look at the aperture and exposure time. The 5.7 aperture is going to give you a sharper picture which will look better showing the fine lines of fireworks. The ISO was also left lower because fireworks are probably going to be bright against a night sky background.Notice that overall the picture is darker than the first one. Night Landscape mode is trying to pick up buildings and things like that, while Fireworks Show mode is assuming a night sky background that will look much better nice and dark.

So what should we take away from these examples? Well for all of you point and shoot users out there, the point of this post is drive home the importance of using your scene modes with your camera.

Point and shot cameras usually do not allow the fine level of control that DSLR camera's allow, and these scene modes are an important way to take back control over your pictures. Your camera is not a mind reader, it relies on you to tell it what to do. Using scene modes you can tell your camera what you expect it to do. Otherwise it has no idea that you want it to gather background light, or that you want it to focus at infinity despite the fact that it can't find anything to focus on because it's too dark outside.

Armed with this new knowledge, I encourage you to break out your manual and read about the modes that your camera offers, and then go out and experiment!

Sunday, December 28, 2008

Back in a Jiffy!

Back-In-A-Jiffy.pngWell, maybe not in a jiffy, but soon here.

There have been a lot of things going on lately, but my poor blog has not been forgotten. The long awaited post on scene modes is coming up, along with a planned post on why getting a tripod can be one of the absolute best investments you can make to improve your photography.

Until then have a look at this web site that goes over some of the basics of scene modes, just to get you in the mood.

Sunday, December 7, 2008

Recap

So you read all about ISO, Aperture, and Shutter Speed. Good, now here's what you probably need to do now, and I know this is going to sound odd. Go back to the beginning and read them all again. Why?

If there is even the slightest fuzziness in your mind over how the three factors affect each other then further study and reading might be needed.

Ask yourself these questions.

If I move my ISO from 200 to 800, what happens to my shutter speed? What happens to the quality of my photograph?

If I change my Aperture from 5.6 to 2.8 what will happen to my shutter speed? What if my shutter speed is still too low to get a sharp picture? Should I do some thing about my ISO, and if so, what?

I am trying to photograph a football game, my shutter is at 1/60 of a second and everyone running is blurry, what should I do to my shutter speed? What might I need to do to my Aperture to achieve this? Might I need to change my ISO too? If so should it be higher or lower?

Those are some of the kinds of questions that illustrate the interrelationship of those three factors. If you don't know how to answer those questions, then reading the others again might help. Reading the ISO post will probably be much more enlightening knowing what you do now about Aperture and Shutter Speed. The same goes for the other two. You might find a few light bulbs turning on.

If my explanations aren't quite doing it, and don't worry my ego won't be too badly bruised, you might try some of these web sites for a fresh point of view on things.

ISO, A discussion of ISO

Keep in mind that when I explained Aperture I deliberately left out things like why Aperture is numbered the way it is and depth of field for simplicity's sake. Those things aren't what is essential to the interrelationship of the three factors and can be discussed at a later time.

Aperture, Another Aperture

Shutter Speed

Don't be put off by the title of the blog, this is a good link to another explanation of all three.

All Three

The thing to keep in mind is that just like your coach, or your math teacher or any one of them might tell you, the basics, the fundamentals, are crucial to being able to genuinely understand the rest of it.

So make sure to understand what we've talked about, and come back for the next post about Point and Shoot camera modes.

We'll learn to decipher what your camera's manual is really talking about when it describes portrait mode and fireworks mode and all of that, and use that knowledge to get the most out of your camera.

For you DSLR users, many of you have some of the same modes, I know my D50 does, but it also has modes like Shutter and Aperture priority, that make knowing these fundamentals, if anything, even more important.

Tuesday, December 2, 2008

Good Podcast

Dan Benjamin and James Duncan Davidson, a famous Mac nerd and a professional photographer respectively, have started a new Podcast called Tack Sharp.

Just to give a feel for the kinds of things these guys are talking about, episode one was Nikon vs Canon, Primes vs Zooms, and White Balance. Episode two was all about crop factor.

The show is very new so they are just feeling out the flow for how the show should run and it means everything is very informal and easy to listen to. And as a bonus you can post to their Google Groups page and usually get a reply from James Davidson and probably some input from the other users too.

Its shaping up to be a good show so be sure and start listening now so when they get rich and famous you can tell your friends that you heard about them first.

Sunday, November 30, 2008

Shutter Animation

Just in case any one is interested, a few months ago Jeffrey Friedl posted a really great animation of a DSLR shutter on his blog. If you don't have a DSLR don't worry. The concept is pretty much the same, just forget about the mirror in front.

Monday, November 24, 2008

Shutter Speed

Today we are going to look at the last of the basics that I want to cover before we move on to other things.

We learned already how ISO is a measure of the sensors sensitivity, affecting how much light is needed to make a picture, and Aperture affects how much light can get to the sensor in a certain amount of time.

The shutter speed is what determines how much time the camera has to gather the light to make a photograph. In daytime photography the shutter speed is usually measured in fractions of a second. When the light gets dimmer like during the evening or night time, shutter speed could easily become more than one second in order gather enough light.

As an example, to take to take the picture of the building below during day light took only  1/1000 of a second

DSC_2917.jpg

But if you are taking pictures in lower light you probably won't be able to get shutter speeds that fast. This next picture was taken at eight o'clock at night. It took 481 seconds, or an eight minute exposer to gather enough light to make a photograph.

DSC_0886.jpg

These of course are some extreme examples, but some thing that you might want to keep in mind is that your shutter speed has a big effect on how sharp your pictures are. This is because one of the most common causes of blurry photo's is camera motion. The reason is the camera is actually moving while the shutter is open because its impossible to hold a camera perfectly still while taking a picture. If the shutter speed is fast enough then the camera's slight movement isn't enough to make the photo blurry. If the shutter speed drops low enough, then you will get a blurry photograph, even if the subject is motionless and the focus is perfect.

To illustrate I have two photo's of the same painting taken at two different shutter speeds.The first image as you can see was taken at 1/6'th of a second. It came out blurry so I bumped it up just a bit to 1/8'th. Roll your mouse over the image to see the results.

So thats shutter speed. I don't update as often as I should, but soon I will try and tie all of this together and then we'll see what we can do with this knowledge, even if we have an automatic camera.

Monday, November 17, 2008

Aperture

Here we are again, and we've got some thing fun to talk about. We're talking about aperture today. I promise that by the time you are done reading this post you are going to know exactly what an aperture is, and not just because you are going to see a picture of one. We are only going to cover the affect that aperture has on how long it takes to take a photograph today. There are lots of other things you can do with different aperture settings thought that will make for many more posts.

At its most basic level, an aperture is the hole in your lens that light has to pass through on its way to the sensor. A larger aperture in your lens will allow more light to get through the lens and onto the sensor, while a smaller aperture will allow less light to get through. You might be asking why some one would want less light to get through? Well there is a reason but we'll get to that in a second here.

When we talked about ISO we saw that increases in sensitivity were higher numbers. Well with Aperture its the reverse. If you want to increase the size of the aperture in your lens, you have to use a setting with a lower number, and if you want to use a setting with a smaller aperture you have to select a higher number.

As an example lets look at one of the lenses that I use a lot, my 50mm f1.8 lens. The number after the f is the aperture and most lenses will usually have the largest aperture they are capable of printed on the side.

My 50mm (and we'll talk about focal length some time too) has an available range of aperture settings from f1.8 to f22. F1.8 is the largest aperture it is capable of while f22 is the smallest. Lets take a look at an example so we can put this in perspective.

Here you can see a picture of my 50mm lens with the aperture set to f22. The hole in thecenter of the lens is the aperture and controls how much light can pass through the lens to the sensor. Put your mouse over the picture and you can see the same lens set to f2.8. You can see that the aperture is much larger which will allow much more light to pass through to the sensor.

Now that we've established exactly what aperture is we can talk about one of its affects on how you take pictures. For today we are going to focus on the apertures affect on shutter speed and why we might want less light to get through the lens at a time.

If we are taking pictures of things that are moving fast and we want the shutter to go fast enough to capture it we could use a high ISO setting like we did with the chess board. But we also saw that doing that can decrease the quality of our images. Instead we can use a wider aperture and the shutter speed will increase without the graininess of a high ISO. The other thing to consider is, what if we are using a low ISO, but there is still too much light for what we are trying to do. Some times we want a slow shutter speed. There is equipment you can buy to accomplish this, but you could just use a smaller aperture. To illustrate what I am talking about I have a couple examples.

You see here a picture of a helicopter that I took some months ago. It looks ok. Its all inTQ-1593.jpg 
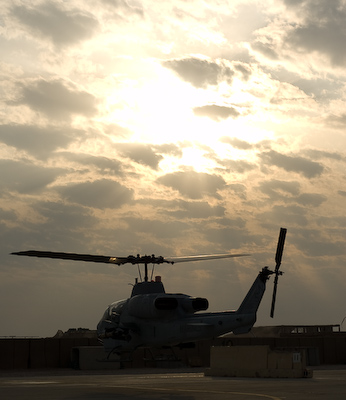
focus and there isn't any blurriness. But in this case thats actually part of the problem. I want a little bit of extra blur in the spinning rotor blades on top to give a sense of motion. The easiest thing I can do to solve that little problem is use a smaller aperture, and you can see the result in the next image.

So I hope this has been a pretty good explanation of what aperture is. As always if you have any questions drop me a line, and I'll be back soon to finish off the basics with shutter speed.

Thursday, November 6, 2008

A Small Delay

So for all of my throngs of fans (two or three) that are waiting for my next post, I am announcing a small delay. Its for a good reason though. Kara and I are leaving this weekend to go to Euro Disneyland in Paris. I wanted to get my post on Aperture done before we left, but it doesn't look like I am going to make it. We are going to have tons of fun, I can't wait. But I also can't wait to get back and finish off this series of posts to lay the groundwork for all my future posts.

When I get back look forward to a post on Aperture, and a post on Shutter Speed. Then I'll do two more to finish it off. One will be to tie it all together and talk about how all three work together to create an image. The final one will put this new knowledge to practical use. We are going to get inside a camera's head and interpret the camera's scene modes. What is your camera doing different in the night scene mode that makes good night scene pictures? We will look at the manual and interpret what we read to help us take better pictures.

So stick with it and you'll be taking better pictures in no time!

Sunday, November 2, 2008

ISO Speed

ISO, along with the other two things we will be covering soon, is one of the fundamental things that needs to be understood in order to really understand how your camera works. Since these three things are so tightly interrelated, some of the things we will talk about won't make as much sense now as they will when we are done covering all three and we get to the recap at the end. So bearing that in mind let's dive in.

When we are talking about a digital camera's ISO, most basically, we are talking about how sensitive your camera's sensor is to light. Since most of you reading this are using digital camera's we are going to concentrate on those right now and we'll leave discussions of film for some other time. The basic question we are answering though is, how much light is it going to take until the sensor records it.

When you look at a camera's specifications it will often tell you the range of ISO's it is capable of. For example, if you happen to own a Cannon SD880 IS, your camera has an available ISO range of: Auto, 80 ,100, 200, 400, 800, and 1600. That Auto setting at the beginning there is why most people don't bother setting this themselves. But even if you can't set this directly with your camera there are still indirect ways to select your ISO, as we will learn in another post that will give better results than Auto.

When you are reading ISO numbers, the lower numbers are less sensitive and the higher numbers are more sensitive. With a low ISO number it takes a longer amount of time for the camera to record the same amount of light. With a higher ISO number, it takes progressively shorter amounts of time to record any amount of light.

So far, this is a little dry so lets take a look at an example to illustrate what I mean.

Take a look at this image I made of a chessboard in our apartment. You can see in the lower right of the picture the ISO setting I used and the shutter speed that was needed to take the picture. The shutter speed tells you how long it took to record that amount of light. Now position your mouse over the picture and it will switch to the second picture I took. The second picture was taken at a higher ISO setting. Look at the information in the lower right of the image and you can see that it took a much shorter amount of time to record the same amount of light.

This is an incredibly useful tool that you can use to reduce blurring in your pictures because it allows you to use much faster shutter speeds when taking pictures. This is why ISO is commonly referred to as ISO Speed, because it directly affects the speed with which you can take pictures.

Watch out though, there is a drawback, and its a big one. Not only is the speed with which you can take pictures directly affected by the ISO setting you use, but so is the final quality of your pictures. The bad part is that in this case the benefit goes the other way. The higher the ISO speed you use, the worse and worse your pictures will look. And if you are using a compact digital camera, instead of a big expensive SLR, (a difference we will get into later if I can remember to come back to it) image quality goes down A LOT and VERY FAST

The images you saw above of the chessboards are the entire thing, and at internet sizes they look ok, but lets look at those same images at the kind of size you might see if you decided to print them. The image you see now is a full size section of the photograph taken at ISO 200,but put your mouse over the picture again to see the same section at ISO 1600. You can see how much worse that photograph looks. If you were to try the same thing with a compact digital camera, or at night, the difference would be ten times worse.

As you can see, different ISO settings have differenct trade offs. Higher ISO setting allow you to take faster pictures with less blur, but lower settings increase your image quality. Which setting to use is an important decision if your camera allows you to make it. My wife's camera, for example, doesn't have a manual ISO setting at all. Many of you out there might have cameras like that. But don't worry, knowing how ISO works and the other topics we will cover soon will still help you have a much happier relationship with your digital camera.

So keep checking back for the next couple posts and this will all start to come together.

Friday, October 31, 2008

Lets Take it From the Top

In my next posts I will be starting with an introduction to the three basic things that affect how your camera takes pictures. There are a lot of other things that affect your pictures, but these are the three major ones.

First I am going to talk about ISO speed. If you used a film camera before going digital you probably remember seeing ISO speed numbers on the film boxes you purchased. Digital cameras still use the term ISO, but we are going to go over what the difference is, what's changed, and what's stayed the same.

Next we will go over Aperture. We will talk about what an aperture is, how to read aperture numbers, and how different aperture settings affect your photographs. There are a lot of different ways that various aperture settings can affect your pictures, and we won't go over all of them, but we will discuss enough to get the general idea and hopefully allow everyone to experiment and come up with some questions of their own.

Third we will cover shutter speed. Shutter speed should be pretty short since what affects it and how it affects the other two are a little easier to understand and deal with. But its important to understand what a shutter is, and to be able recognize its affect on your pictures.

Lastly, once we have those three things covered, we can bring it all together and understand how the three of them are interrelated. You can't really get the pictures you want without considering how all three of these properties are working together to create your pictures. When we are done we should understand why you can't change one of those measurements without affecting the other two.

This is going to be a series of posts that could take a while to complete, but don't let that stop you from asking other questions along the way if you have specific questions about other things.

Tuesday, October 28, 2008

And so, It Begins

Hello every one, and welcome to the first entry in my Photography blog.

I started this blog for really two main reasons. The first is I love photography, but I don't always get to go out and shoot photographs as often as I would like. Since it's often said that the best way to learn is to teach, I thought one of the best ways to keep learning about photography and growing within the field would be to research and learn about the questions of others.

The second reason I wanted to do this was because of the inadequate answers I often give to people who ask me questions. Too often when some one asks me a question I don't have a ready diagram or enough time to give as thorough an answer as I would like.

So on the assumption that its quality and not quantity that is important, I would like to use this space to more fully answer questions. I won't be able to answer as many questions, but I hope that here I can give answers that are more enlightening.

What kinds of questions will I be answering? In short, yours. Have a question about a photographic technique? Or maybe a function on your camera that you don't know what it is? Don't know how to set the White Balance on your camera? Or better yet, want to know what White Balance is? Believe me, there are tons of other people that want to know the same thing.

So follow the link to the right to ask me a question and lets get this party started!